Wednesday, July 31, 2013

Wallpaper Wednesday - Delightful Blue and White Damask

 
Welcome back to our second Wallpaper Wednesday.  This week's theme is blue and white damask.  Blue and white is very popular right now.  It really is a relaxing and soothing combination.  Using the blue and white in damask really brings up the sophistication level and fits very well in antique and traditional homes.  I've always wanted to use this color combination in my home but right now my interior colors are warm neutrals.  My dining room is done in brown and off-white damask. Someday I'll get to use this color scheme.  At least I can pretend and visualize what it would look like on my blog!
 
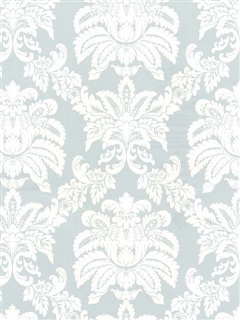
My go-to for buying wallpaper has always been American Blinds and Wallpaper.  Just happens that they are having a 15% off Damask Sale right now!!  I'm always a sucker for a good wallpaper sale.  Just ask my Dear Husband and he'll tell you about the unused rolls of wallpaper in my attic.   The gorgeous wallpaper below is only $18.81 per double roll!  You can't beat that.  I'm in love... (don't worry they aren't paying me to sell this paper)


White Duck and Egg Blue Damask Norwall Wallcoverings


Love the light damask wallpaper paired with the silver planter and blue and white china. Orchids are always so elegant!


Thankfully, wallpaper is back in style.  Although, I never felt like it was really ever out of style.  I've tailored back my use of wallpaper and use it to make a statement now.  My choices are bolder.  You can be bold and make a statement in your home if most of your areas are neutral.  My dining room is in the center of my home and you can see the bold damask wallpaper from almost every room.  The rest of my rooms are neutral and warm and flow into the dining room.

Bold statement wallpaper! Farrow & Ball Lotus wallpaper 


 So sophisticated! Pinterest


What a beautiful foyer wallpaper and chandelier combination. Interesting how it all works with the rustic floor and simple striped rug. 


Bridgewater Damask - Serendipity, Blue Thibaut Serendipity Wallpaper

I can't imagine this hallway space with any other wallpaper!  It is just so perfect with the picture frame wainscoting.


You can soften the combination and make it warmer by using cream instead of stark white.  This is such an elegant seating area against that beautiful fireplace.


Kelley Proxmire Decorator.  Photo - www.cococozy.com
I just love this bedroom combination.  The blue and white damask wallpaper and the gingham fabric are beautiful together.  Definitely a favorite combination of mine! 


What a charming girl's bedroom!  So sweet!


Thanks for sharing in my love of beautiful wallpaper! 
 
If you've enjoyed this post please subscribe to my page, leave a comment or pass this along to a friend.

Have a wonderful day!


Tuesday, July 30, 2013

My Beautiful White Picket Fence!


I'm so excited to share these photos of my new white picket fence!
 
We've come along way over the last month in our major landscaping and retaining wall project.   Now that the fence is in, I can order the sod and the rest of the shrubs and plants! 
 
The fence is a special order through Home Depot. It's pro series fencing called the "Veranda Silverbell" scalloped fence.  It is a very sturdy white vinyl fence that does not look cheap and never needs painting!  The wide pickets definitely give it a more high-end look.


The gray stone retaining wall needed some sophistication and this beautiful white fence does the job!

There will be plantings of Dwarf Alberta Spruce, Blue Hydrangeas and Large Hosta in front of the wall to soften this large area.

The upper area is going to be a small formal garden with sod, boxwoods, cements urns and pretty annuals.


Lots more to come!  We hope to have the sod delivered this week and start planting next weekend.

If you've enjoyed this post please subscribe to my page, leave a comment or pass this along to a friend. 

Have a wonderful day!

Wednesday, July 24, 2013

Presenting Wallpaper Wednesday - Totally Toile

I've been obsessed with beautiful wallpaper for well over a decade.  I could spend days looking through wallpaper books and be in heaven.  This love of wallpaper has inspired me to have "Wallpaper Wednesday."  Each week (or as often as possible) I'll have some beautiful wallpapers to view for inspiration.  We won't just be limited to designer wallpapers, we'll look at all kinds even the cheap stuff.  Just because it's a bargain doesn't mean it can't be beautiful!

I taught myself to wallpaper when I was in high school.  My parent's had a very old house.  My Mom wasn't very handy and my Dad had a Depression Era mindset; if it isn't broke - don't fix it!  If I wanted my room painted or wallpapered I had to learn to do it myself.  SO I DID!  I'm so thankful that I have that skill today.  It has saved me a lot of money fixing up old Victorian Homes.  Old Victorian's love wallpaper and they use a lot of it!

I've run into all kinds of challenges with wallpapering.  If you know old homes, you know that nothing is level or easy to work with.  You could say I learned in the boot camp of wallpapering: old homes with unlevel walls and ceilings and sometimes smoke stained or crumbling old horsehair plaster.  You learn quickly how to fix plaster and work with unlevel areas.  There are tricks to wallpapering.  If you have questions, please feel free to ask.  I don't guarantee my advice, so if you take it and it doesn't work - please remember it was free advice.  :-)  The best advice I can give you is to ALWAYS buy extra wallpaper.  Buy more than you need.  It may seem expensive at the time, but imagine if you screw up an area or your measurements are incorrect and you end up a roll (or even a sheet!) short and the paper is discontinued.  It has happened and it is just a nightmare.  Consider it your insurance policy to protect your expensive wallpaper investment.  Trust me and buy at least one extra double roll.  If you have a big pattern that loses a lot with the pattern match then buy two extra!

So let's start our first Wallpaper Wednesday. 

This week's theme is The Toile Light Zone... 

You're traveling through another dimension,
a dimension not only of sight but of mind;
a journey into a wondrous wallpapering land whose boundaries are that of imagination...
That's the signpost up ahead-- your next stop . . . the Toile Light Zone!

Sorry... haha.  Okay on to business.

Which are your favorites?

Powder Room: 

Powder Room with Black and White toile wallpaper
By Joe Cook Interior Design
Blue and White Toile - Schumacher, Pinterest
 
Elegant Bath!  Just love this gold toile wallpaper by Scalamandre wallpaper, Decorated by Pamela Laney


Kitchen:

Daring bright yellow and white toile in the kitchen.  Very cheerful and bright!  Pinterest

Cottage Style - Blue and White Toile Kitchen.  How adorable!  Pinterest


Dining Room:


Brown and White Toile-de-jouy-wallpaper - Pinterest
If you've seen my dining room you already know I'm partial to the brown and white look above.  I love the brown toile.  It really isn't dull at all.  It's very versatile, sophisticated, warm and it's neutral.


Bedroom:

Wonderful gold and cranberry toile.  Love the monogrammed pillows.  Pinterest.


Bedroom in Gray Toile - Pinterest

Please let me know if there are any particular wallpaper topics you want to discuss.  This is just the first of many posts on this topic.

If you've enjoyed this post please subscribe to my page, leave a comment or pass this along to a friend. 

Have a wonderful day!

Saturday, July 20, 2013

Walk this way... DIY Paver Walkway

One walkway done... one more to go. Can you believe my husband did this? He's handsome and handy!


It certainly was back-breaking work for him.  Hard to believe this was the first time he ever built a walkway.  The toughest part is in the prep work.

I'm so glad I picked these cobblestone pavers.  They really are beautiful and go so well with the house.  Poor old house was so neglected before we bought it.  It deserves to be beautiful!

I'll have better pictures and more information on this project after he finishes the second walkway.  The other walkway has a pretty big curve so his natural talent will be put to the test! 

If you've enjoyed this post please subscribe to my page, leave a comment or pass this along to a friend. 

I hope you have a wonderful day!

Friday, July 19, 2013

Crazy stuff going on at my house... Landscape design

Here's a peek at all the crazy stuff going on at my house... 

We are on a quarter acre city lot and the majority of our yard sloped heavily.   The good news is that section of the little yard is private on three sides and if we cut out some branches on our trees we get a lake view!  I'd been frustrated about not being able to use this side of the yard.  The upper part had very overgrown bushes and you couldn't even put a chair out there because of the steep slope of the yard.  Mowing wasn't much fun either.

My home was built in 1885 and it surprises me that so many large families lived in the house but no one ever dealt with the sloping lawn.  I think most of the kids walked to a park close by or played in the street.  Just seems like such a waste of space not to utilize that yard area.

My neighbor owns a commercial construction business and agreed to do a residential job for us.  To bring it up to level, we would have needed a very tall retaining wall.  We decided to do two levels and have a raised patio and lower lawn area.  It's not a large space but at least it will be functional.  I'm looking forward to enjoying morning coffee in our new patio space.

It's a work in progress...


This is how the house looked when we moved in 8 years ago. 
So dark... It was like it was in a cave.


Above is the most recent photo before the project started.  Believe it or not we pruned and cut back all the overgrown trees so you could see the house.  The Oak took over again.  You'll see in the new photos we've pruned it again. :-)  I love Oak Trees so I would never cut it down.
 
Unfortunately, you can't get a good idea of the steep slope in these photos.  The pallets in the front are for our walkway project (which will be in another post).


This is taking A LOT of fill!  The lower wall is about four to five feet above the ground.  It just looked like such a mess.  I was really worried about how it would turn out.  Once the upper part was built and leveled, I could start to see how it would come together.


There's my poor neighbor working hard on a humid, 90 degree day.  You can get an idea of the slope we were dealing with from this photo.  I'm not in love with the grey block but once it is all landscaped with shrubs it should soften up a lot.  Unfortunately, the choice was about budget.


We had to remove huge Rhododendrons from this area. Now we've exposed the ugly red foundation that needs some re-pointing. We'll be painting that ugly foundation a color that goes with the house and fixing those windows.


Now the fun part begins...  dressing this thing up and putting on the lipstick.  This upper part will have a clean row of boxwood with some cement urns on each side of the stairs.  It will be filled with this pretty rice stone.  It actually has a sparkle to it that you can't see in this photo.  The lower level will be sod with a white picket fence. 


 I bought a set of these gorgeous urns at Brimfield Antique Fair.  Can't wait to use them on the new patio! 

I'm still worried about how it is all going to look.  Keeping fingers crossed that we can pull it all together.  At least we will have a space that we can use and that will help with resale in the future.  Watch for my updates on this project.  If you have any advice on plantings, landscape or garden ideas, I would love to hear from you.

If you've enjoyed this article please subscribe to my page, leave a comment or pass this along to a friend. 

I hope you have a wonderful day!

Tuesday, July 16, 2013

How to Design a Traditional Garden Landscape on a Small Budget


Mrs. Whaley's Charleston Garden ~ Classic Garden and My Favorite! http://designinspiration.typepad.com/design_inspiration_planet/2008/07/mrs-whaley-and-her-charleston-garden.html

It is possible to create a traditional garden landscape on a small budget if you keep in mind the design elements that go into formal gardens.

While Mrs. Whaley's garden is my all time cozy favorite, I realize that I do not have the space or the funds to recreate her garden in its exact form.  What I can do is get the same feeling by understanding the elements that go into a formal or traditional gardens and incorporate as many as I can within my budget

If you have an inspiration photo of a garden you absolutely love, try to pick out the parts that appeal to you the most.  You may not be able to have everything you want but you can be creative and add some statement pieces to your garden.


Photo - The Enchanted Home

For example, when I look at Mrs. Whaley's garden what appeals to me is the privacy, the white fence, the outline brick shape around the grass and the focal point of the statue at the far end.  I also like the shrubs mixed with the roses and potted flowers that add color against all that lush green.

Keep in mind that most formal or traditional gardens have the following three main elements:


1.  Classic accessories such as:
Urns or ornate planters -  Use one as a focal point or use two or more symmetrically.
Statues -  Always a favorite of mine in a beautiful garden.  Statues offer a higher level of sophistication to a formal garden.  You can have it as a focal point like Mrs. Whaley's garden or in another area surrounded by boxwoods.
Fountains or bird baths -  If you can't afford a fountain consider a cement bird bath.  Some of the large home improvement stores are carrying them and they are an inexpensive way to add interest to a section of your garden.  The little birdies will love you for it!
Garden Screens, Arbors or Pergolas - If you have the budget for these items they can really make your garden feel like a separate room.

2.  They are tidy and orderly:  Think clean lines.  You can create this by making a path out of inexpensive crushed stone or pavers.  Just be sure to keep the lines around the paths edged and clean looking.  You don't need to add brick or metal edging around your gardens but learn how to edge your gardens yourself to save money.  Turns out it is very easy and there are a lot of YouTube videos on edging a garden (I've included a link to one below).  You probably already have the tools to do it since all you need is a flat ended spade or you can buy a half-moon edger at your local hardware store.  Properly edged gardens are beautiful.  I tend to like them better than the ones that are too busy with stone, metal or horrible plastic edging.  Save all that extra work for your pathways.

This Old House Video on How to Edge Your Garden

3.  Balanced:  When you look at most traditional gardens they repeat plantings.  You'll see lines of boxwoods and symmetrical plantings across walkways or seating areas.  You can keep you cost down by watching for sales at the end of season sales on hydrangeas, boxwoods, dwarf spruce to add the outline to your garden space.  For example, consider using large cement or black urns at each end of a garden bench.  Plant each urn with a dwarf alberta Spruce surrounded by white impatiens or petunias.  Then continue the white with a couple of hydrangea bushes.  This balance and symmetry can make small gardens feel larger. 


Photos: Pinterest


One last point to keep in mind on your garden landscape budget is to spend the most you can afford on the permanent fixtures and focal points such as a pergola, urns, statues and walkways.  This is the same way you would treat your home decorating budget - spend on the big impact items first.  Even if you have to buy one item each season, you will save money in the long run and will have a space you truly love.   Creating a beautiful, traditional garden space on a budget is very easy to do as long as you're willing to do some searching for bargains and a little gardening work yourself. 
 
If you've enjoyed this article please subscribe to my page, leave a comment or pass this along to a friend.  Thank you!


Monday, July 8, 2013

Green Animals Topiary Garden, Portsmouth, RI

Green Animals is the oldest topiary garden in the United States.  It has over 80 different topiary.  The shapes range from birds and animals to geometric figures and ornamental designs.  English Boxwood, California Privet and Yew are used for the sculptures.

When I get the chance to go to Green Animals, I'm as excited as a little girl going to Disneyland!  This property is about as close to perfection as you can get.  It has a lovely white antique house with a wrap-around porch overlooking Narragansett Bay.  I would be in heaven if I could just grab a cool minty Mojito, sit myself down in a rocking chair and watch the sailboats go by all afternoon.  If that isn't heavenly enough, walk along the wide gravel path surrounded by meticulously trimmed green archways and make your way to the gardens.

(Click on the photos to enlarge)

“Life becomes precious and more special to us when we look for the little everyday miracles
 and get excited about the privileges of simply being human” - Tom Hansel

  
If you are as moved by beautiful landscaping as I am, you may find yourself getting choked up at the loveliness of these gardens.  When you consider the time, effort and planning it has taken to achieve these results, you know that the folks working and volunteering at Green Animals must love every moment of their effort.  All their efforts have produced magical results in the luscious, colorful plantings and playful topiaries in the gardens.

Gardener Joseph Carreiro and his son-in-law George Mendonca were both superintendents of the property and were responsible for creating the topiaries.  Their family managed the property for 80 years; starting in 1905 until 1985!  What a wonderful family creation.  I can just imagine the grandchildren visiting and looking in wonder as they are told "Your Grandfather made these green animals!"

If you love topiaries, marvel at these!


Just love the Bear!


 Now on to the flowers and plantings...


 Blue Hydrangeas are always a favorite 
This photo really demonstrates the lushness
in the layering of the plantings.
 
A New England couple
  working in their garden!  
  

Love the archways and covered paths!
      
 Just breathtaking from every perspective!
  
See the little bird?  It was like he was posing for his picture!
  
Exploring Green Animals topiary garden is a wonderful way to lose yourself for an afternoon.  The gardens are extraordinary and impeccably maintained with layers of colorful plantings.  The property is owned by the Newport Preservation Society and is located in Portsmouth, RI.  If you are interested in exploring Green Animals, I have included a link to information below.

http://www.newportmansions.org/explore/green-animals-topiary-garden

One last photo of the house and gardens...

Thank you so much for visiting my blog!  If you have any suggestions for improvement, I'd love to hear from you.